Designed by Veethemes.com

Latest Posts

This week is a monumental week.  Something has happened that I never thought in a hundred lifetimes would happen. 

I have knitted a jumper. 


Clearly I didn't knit the whole thing this week, it has, in fact, taken more than a year.   A whole year.  To knit a jumper.  I know full well that my Nan could have done it in a couple of weeks, and I know that I could have trotted to Primark and bought something in a matter of minutes, but I'm gonna say it again, and let it sink in: I. Knitted. An. Actual. Jumper.

I could literally burst with pride at this precise moment.  I LOVE IT.  One of the sleeves is tighter than the other, there is a twist in a stitch at the front, and I had to reknit one entire side as by the time I got to the end of the last sleeve, because my tension had changed form that of a banana fingered beginner, to an accomplished novice.  But I don't care.  It's a design I like, in colours I chose, in a shape that flatters me, and there isn't another one in the whole universe that is like mine.


And my god, am I going to cherish it .  I guess this is THE definition of slow fashion for me.  Taking the time to make something, in fact giving a year of my life to make something (well, on and off, but it sounds more dramatic that way) that will stay in by wardrobe for the rest of my life (hopefully). 

If we're gonna go over the Sustainability Checklist:

Do I have an emotional connection to my garment?  Hell yeah
Did I have to slow down, think about my actions and actively chose to make it?  Yes I did
Was it made an ethical environment?  My sofa is very ethical and comes with cake and biscuits on tap
Is it from a sustainable source?  The cotton is organic, fair-trade, so yup
Was it made using traditional, artisanal techniques?  Yu-huh
Does it come in sustainable packaging?  hat a convenient segway into talking about We Are Knitters...

My jumper was made from a kit by the uber cool WeAreKnitters, all their packaging is paper so easy to recycle, all their needles are made of beech wood, so planet friendly.  And as a tip for any other novice knitters out there, MUCH easier to use than plastic or metal as the stitches are not so inclined to slip off.  I know right?  The pattern was super clear, there was diagrams and shiz, it was awesome.  They are also the most contemporary and stylish knitting collective out there, go check them out.


Now I've finished one, I kid you not, I've started the next one.  Well, when you're a crochet designer by trade, you've gotta have a hobby :)


Ok, so I'm not going to spend this WHOLE post complaining about the God-awful-too-British-for-this-heat-I'm-moving-to-the-artic weather, but is does need mentioning.  IT'S SO HOT!!  How to deal with this?   Well firstly, there's ice lollies, which means secondly, there are lolly fans.


What do you do with all those lolly sticks that you keep finding poked into different bits of the furniture by errant children?  Make a little, Chinese style paper fan of course.  Oh, and educate the children in the art of not poking rubbish into places it shouldn't be,  upcycling and not buying stuff that you can make yourself.

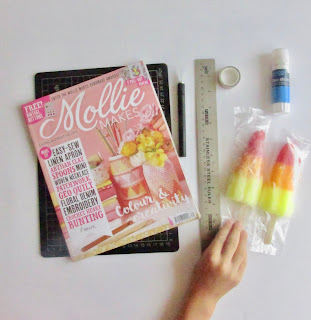
The paper in this instance is those beautiful sheets that you get in the middle of Mollie Makes or Flow magazine, that you never know what to do with, but keep anyway because they're so pretty.  Or, at the request of the eldest beast, you could use the front cover of the Beano.

Here's the recipe:

Ingredients
2 lolly sticks
2 sheets of A4
Sticky tape
Glue stick

Step 1: Get 2 sheets of A4

Cut in half length ways.  You will need 3 strips.
Step 2:
From the bottom edge, fold up 1-2cm, then fold to the back the same width - just like making a paper fan when you were at school.


 Do this to all 3 pieces.

Glue all 3 pieces together, end to end.

Step 3:
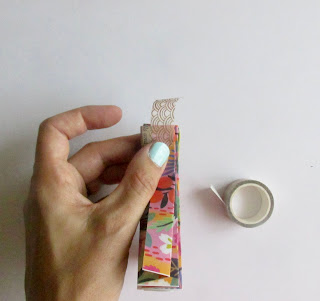
Pinch into a fan shape...


...and tape around a cm at the end.


Step 4:
For both edges - cover the lolly stick in glue, leaving roughly 2cm at one end.

Stick to the edge of the fan, making sure you don't cover the bit that you taped.

Leave to dry for a few mins and then ta daaaaaa!


I did try this with a pair of knitting needles too, but you need at least 5 sheets of A4, cut down to a slightly awkward width of around 15cm, so there's a but more waste than I would have liked, and a stronger, fabric tape to hold the needles in place.  And while not as neat, it is rather lovely.


We have two gorgeous teachers leaving school forever this year, and I wanted to give them something heartfelt and thoughtful as a parting gift.  I also totally forgot that the end of term is tomorrow, so screw buying something, and forget cut flowers (there are gonna be enough bundles of those brash bad boys about), this is last minute, GORGEOUSNESS made from weeds and trash.

I can't take all the credit for this idea, with the feedback from the insta-questions that kicked this whole thing off, there were heaps of people that shared ideas for getting creative with wrapping.  There was also a reminder that sellotape goes in to your single-use, plastic count (I know, another thing to worry about), but, with the excellent suggestion of taking it old-school and just using string.  My Grandma still sends me parcels like this, but she is from the Pre-tapeolithic era, so it's not surprising.

There were also some chaps that explained how a potted plant is WAY better than a cut flower, as it takes a whole bunch of resources to grow, cut and ship them.  Yes, yes, this is wrist slittingly depressing, but don't panic, I present you with a beautiful alternative...


... ta daaaa!  I know right?!

These are made with road-side 'weeds', a couple of fern leaves from the scrubland by my house (don't worry, this is an area regularly mown by the Council, so all of it gets chopped down and carted off every few months any away), the three sweetpeas I managed to grow this year, a couple of strands of jasmine & budlea, and my absolute favourite idea: grasses.  Not many, just a few, long, fluffy, frilly stems, but for me they make it seasonal and magical.

Wrapping is courtesy of the Sunday papers, and as a treat (and genuine sacrifice) I have used the puzzle pages.  I know, I'm SO generous.  (We do bloody love the puzzle pages, they stay on the kitchen table for the week, so everyone can dip in and out of them at breakfast.)

So here's a little guide to making a bunch of flowers that will stand out with their simplicity and seasonal beauty, and a little wrapping idea that is 100% good for the environment AND makes my heart incredibly happy to look at.

Flower Bunches Recipe
Newspaper
String
Scissors
Flowers, grasses, leaves

Step 1: Use your big leaves at the back for structure


Step 2: Pile everything else on - I tend to go tall first, fluffy next, big bits in the middle, then pretty little bits at the front.


Step 3: Find a pretty bit of the newspaper, and cut out a square shape.  Fold in half to make a triangle.

Step 4: Wrap around the bottom of your bunch and tie with string to secure.


Wrapping Recipe
Newspaper
Scissors
String
A few leafy scraps


Step 1:  Cut quite a long length of string, go around the top of the parcel, cross over at the back, and tie on the top.


Step 2: Artfully place a few botanical bits on the front, and secure in places with the string.

Step 3:  Step back and look at just how gorgeous you make make soemthing with some newspaper and weeds.

Today's make is inspired by two things.  One is the incredible experience of being nominated and attending the Mollie Makes 2018 Handmade Awards this week.  It was such a privilege to be asked to go, especially seeing as this is such a new space, and although we didn't win, the girls that did, utterly deserved it and my heart couldn't have been happier. 

Part of the day was a talk by a group of ladies who have made a serious living out of their craft passion.  That was inspiring enough, but Sara Tasker, social media super-pro, said something that really resonated with me:

  "Share the things you love, because people will know if you're being inauthentic".

I have been trying to think of the best way to order the things I share in this space, the build an 'identity' around it.  And do you know what I really wanted to be doing?  I wanted to be playing along with the British Heart Foundations #thebigstitch that's running until the 15th of July.  So that is exactly what I have done.

Which means that today's make is another upcycle.  This time, a piece of inspiration more than an exact pattern, but hopefully it'll get your creative thoughts flowing and you'll think of something that you can turn on its head too.


Allison Playsuit
You will need:
Massive dress with sleeves
Scissors
Needle & thread
Sewing machine
Fabric scrap


Step 1 Don't bother with unpicking, just go straight in with the scissors and chop the sleeves off...


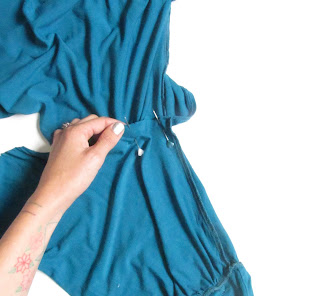
...the sleeves will then become the new legs!  Line them up, wiggle things into place and pin.  If you prefer, rather than pinning, run a round of running stitch to get them in place.


Step 2  Get the sewing machine out and stitch them all together.  Look!  Hareem pants!


Step 3 . Using your scissors, fold in half and neaten up the arm holes.  As this is made of jersey, I'm just going to leave the edge raw as it will roll nicely.


Now take out some of the back if you need to, this is to make it a little easier to get on.


Step 4   Give it a little shape by stitching a piece of material around the back section.


Step 5   Lounge around your house feeling uber cool and exceptionally comfy.
Hi Chaps, today I thought I'd share a very simple but super effective upcycle.  The British Heart Foundation have launched #thebigstitch for July, which is a social media thang for everyone to share ways that they customise and create new things from preloved stuff.  It's a great way to donate money to charity and pick-up something that you can get confident with the scissors on.

It's also one of my favourite ways to spend a hot summer evening.  Needle and thread, cool breeze under the tea lights, perfect.

This is called a 'rule of thumb' make as I'm not a great one for measuring and being very precise.  I tend to use my thumb as a guide for the length of the stitches I'm making, where I put my needle, that sort of thing.  It's something my Dad taught me when I was young and I've just always done.


You will need:

1 x jumper/sweatshirt
Sharp scissors
Matching needle and thread
Some embroidery threads
Embroidery Needle

Step 1
Cut the sleeves off just above the elbows

Roll the cut edge over a couple of times and stitch in place at the top and bottom.

Step 2
Pick a colour and make some very simple, vertical stitches around the neckline.

Pick another colour, and now here are some 'v' stitches.


How about some cross stitches in the next colour?


And then keep playing with whatever feels right.

Don't be afraid to pull out anything that you don't like, I re-did my blue row 3 times before I was happy with it.  There are no right and wrongs with this kind of make, it's really about the pleasure of experimenting and building up your confidence.